
GymMaster Gym Software Manual
Doors and Readers
GymMaster software combined with door access hardware form an access control system which allows automated individualized entry
- Hardware
- Gatekeepers: Gatekeeper H6 · Gatekeeper H5 · Gatekeeper H4 · Gatekeeper Mini 4 · Gatekeeper Mini 3
- Door readers: Sentinel Wall Reader · Sentinel Keypad · Cidron · CN485 · CV485
- Desktop readers: Desktop Reader · Sentinel Desktop
- Other: Tailgating cameras · Key Fobs
- Installation and Documents
- Integrate Hardware with GymMaster
- Manage Doors
- Door Access
- Troubleshooting
- Frequently Asked Questions
Gatekeeper Mini 4
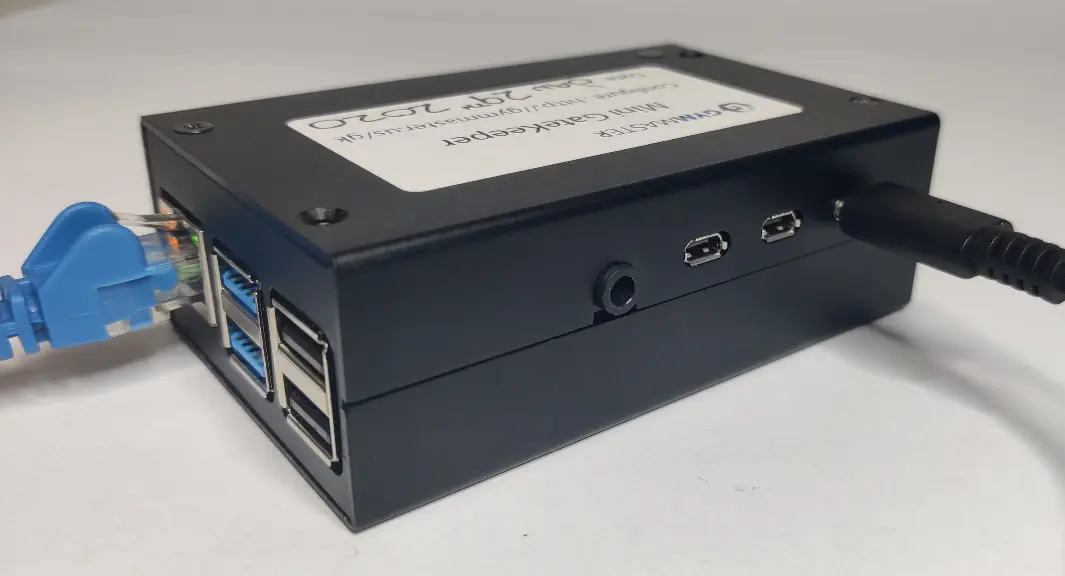
The Gatekeeper Mini 4 is a small controller unit for check-in at reception and for Point of Sale.
How it works
What it does
The Gatekeeper Mini connects GymMaster to the equipment at reception. It operates desktop readers, barcode readers, receipt printers and cash drawers through its USB ports. It cannot control doors. To control a door, use a full Gatekeeper H.
A member holds an RFID fob near the desktop reader. The reader sends the fob data to the Gatekeeper Mini through the USB cable, the reader beeps. and a pop up shows in GymMaster.
The Gatekeeper Mini must have power and a connection to the internet. If the network connection stops, the Gatekeeper Mini can operate in Offline Mode for short periods.
After you install and test the Gatekeeper, register it at gymmaster.com/registergk.
To register the Gatekeeper Mini, use the MAC address on the sticker on the Gatekeeper Mini. If this is missing, contact GymMaster to get your device MAC address.
Parts and connections
The Gatekeeper Mini 4 has a small black metal case. One side of the case has holes for ventilation.
| Side | Connector | Use |
|---|---|---|
| Front | Ethernet port, with LEDs | Ethernet cable (Cat5 or Cat6, not supplied) to a router or a network switch with internet access |
| Front | 2 blue USB 3.0 ports and 2 black USB 2.0 ports | Desktop readers, barcode readers and receipt printers. Do not charge phones or other devices from them. |
| Side | Power (USB Type-C) | Gatekeeper Mini power supply |
| Side | 1 micro HDMI port | Web interface for a static web video or website. Contact GymMaster to setup. |
| Side | 1 micro HDMI port and headphone port | Not used |
- Cash drawer: Usually, connect the cash drawer with an RJ11 cable to the receipt printer, not to the Gatekeeper Mini. If you have no applicable receipt printer, use a USB cash drawer kicker. For a cash drawer with only an RS232 connector, use a serial-to-USB adapter, and speak to GymMaster.
Note: Use the power supply that GymMaster supplies only for the Gatekeeper Mini. Do not use it to power other devices.
Network connection:
The Gatekeeper Mini must have a connection to the internet. Connect it to a router or a network switch with an Ethernet cable.
| Requirement | Value |
|---|---|
| Connection | Wired Ethernet, Cat5 or Cat6 cable |
| Outgoing ports (open in the firewall) | 22 (SSH), 80 (HTTP), 443 (HTTPS) |
| Outgoing ping | ICMP |
Note: If a firewall blocks these ports, the Gatekeeper Mini cannot connect to GymMaster. If an IT team manages your network, ask them to allow (whitelist) the Gatekeeper Mini.
To find a firewall problem, switch off the firewalls in the network for a short test. If the Gatekeeper Mini then operates correctly, a firewall blocks it.
Lights and sounds
Use the LEDs on the Ethernet port to examine the Gatekeeper Mini.
| Indicator | Meaning |
|---|---|
| Ethernet port LED on (solid) | The Ethernet cable is correctly connected. |
| Ethernet port LED flashes | There is network activity. |
| No Ethernet port LEDs | The Gatekeeper Mini has no power, or there is a problem with the network connection. |
Related Documents
There is no data sheet for the Gatekeeper Mini. The information on this page is from these documents:
- Gatekeeper Mini Set-up Instructions (PDF)
- Register your Gatekeeper Mini (PDF)
- Reader Troubleshooting Guidelines (PDF)
- Register your Gatekeeper (PDF)
- Replacing your SD card (PDF)
- Hardware documents
Next - Gatekeeper Mini 3

 2026 © Treshna Enterprises Ltd.