The Member Page is the central hub for everything related to an individual member’s account.
From here, you can view details, manage memberships, handle billing, communicate, book sessions, and track training.
To keep things clear and easy to navigate, the page is divided into key sections, each accessed via its own tab.
The left side-bar is described within it’s own page.
Details Tab
Memberships Tab
Accounts and Billing Tab
Communication Tab
Bookings Tab
Training Tab
Side Bar
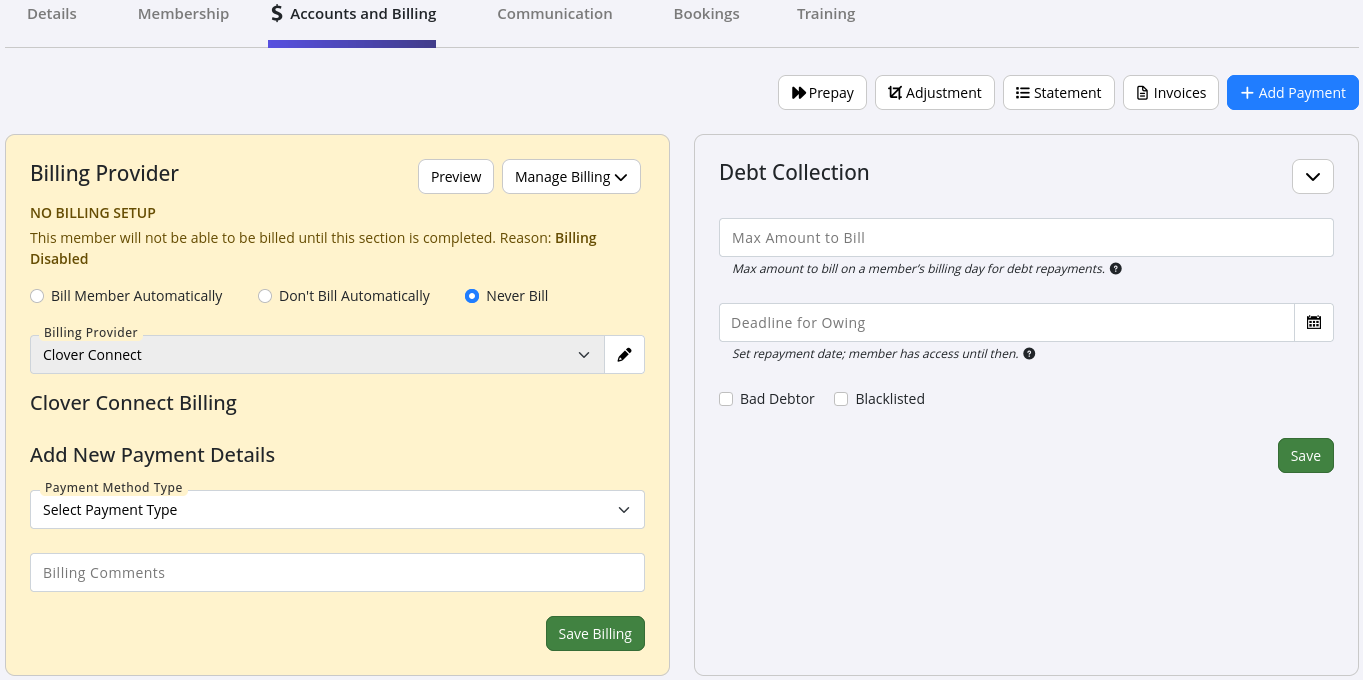
Billing is setup here, used when member is paying for a membership with regular automated installments, such as weekly, fortnightly, monthly and so forth.
Here you can also add in person payments, credit/debit notes, view statements and invoices from this page.
Use Prepay to record payments made in advance toward future membership fees.
Select the membership and how far ahead the member is paying, and GymMaster will take you to Point of Sale to process the payment.
Once completed, the member’s account will reflect a credit that is applied to future billing.
Adjustments are used to manually change a member’s account balance.
This includes applying credits, adding charges, correcting billing errors, or recording refunds for accounting purposes.
Adjustments affect the member’s account balance and reporting within GymMaster, but they do not move money in or out of the member’s bank account.
Key terms when adding an adjustment note:
Credit Note:
Use a Credit Note to reduce what a member owes or to place their account into credit.
This is commonly used when correcting an overcharge, applying a goodwill credit, or reversing a previously raised charge.
Example
Member is charged $25 for the first month, when this was meant to be free.
Instead of refunding this amount, use credit note to apply a $25 credit to their account, which can be applied in the future to selected charges or purchases.
Note: nothing is physically refunded to member when using a credit note. This records changes in their account only.
Debit Note:
Use a Debit Note to reverse or reduce a previously recorded payment.
This is typically used when a payment was recorded in error.
Example:
Member pays $20 at reception for a casual visit to the club.
The staff member accidentally records the payment twice, showing $40 paid instead of $20.
To correct this in their account:
Note: nothing is physically refunded to member when using a debit note. This records changes in their account only.
Create a statement of account for the member by selecting the required date range.
Statements can be viewed on screen, emailed directly to the member, downloaded, or printed as needed.
View all current and historic invoices linked to this member, including any uninvoiced items.
From here, invoices can be viewed in detail, edited, emailed, printed, or paid.
Items can be added or removed from current invoice.
This link opens the Point of Sale screen, showing all outstanding and future charges on the member’s account.
Select the charge(s) the member wishes to pay, then complete the payment through Point of Sale as usual.
GymMaster integrates with your billing provider. The billing provider securely stores member billing details, while GymMaster records all financial activity, including recurring membership charges, product purchases, and service or class payments. GymMaster initiates charge requests, which are then processed by the billing provider.
The default billing provider is pre-selected based on your settings under Financial Configuration > Billing Settings.
Key terms when setting up member billing:
Bill Member Automatically: Fees are charged on schedule according to your billing settings and the membership payment frequency. This is recommended for most clubs.
Don’t Bill Automatically: Charges must be processed manually by staff. This may suit short-term situations but is generally not recommended.
Never Bill: Use only when all payments for this member are made in person.
Pending Review:
This status appears only after a member fails a defined number of consecutive payments. The amount of failed attempts is defined in Settings > Advanced Configuration > Billing Settings > Billing Fail Limit.
Automated billing will be paused until a successful manual payment is made. This may occur when a staff member processes a payment through Point of Sale, or when the member pays via the Member Portal.
Once a successful payment is received, the Pending Review status automatically resets and normal billing resumes.
Add Payment Details:
The wording and options listed here will vary depending on the billing provider selected.
Select the member’s payment method and enter the required details.
Use this section when a member has an outstanding balance that cannot be paid immediately.
You can set up an agreed repayment plan and deadline for when the debt will be cleared.
As long as the member keeps up with the agreed repayments and holds a current active membership, they can continue to access the club.
Max Amount to Bill:
Sets the maximum total amount that can be charged in a single billing cycle when a member is repaying an outstanding balance.
This is typically used when a member is paying off debt over time while also continuing regular membership payments, to prevent excessive charges in one cycle.
Example:
A member owes $100 and agrees to repay it at $10 per week. They also continue to pay $20 per week for their membership.
The Max Amount to Bill should be set to $30 per week.
Deadline for Owing:
Enter the agreed date by which the debt must be fully paid.
Bad Debtor:
Selecting this option places a visible warning banner on the member profile, alerting staff that the account is overdue.
Bad Debtors can be reported, by selecting ‘Member Bad Debtor’ in Edit Reports > Add Field.
Blacklisted:
When enabled, this status will:
This is typically used for serious or unresolved debt issues, or breaches of the member code of conduct.
Note:
Blacklisting a member does not automatically cancel their membership.
To also prevent club access and new bookings, you must cancel all active memberships and then apply the Blacklisted status.

This section lists all charges and payments that are due now and have not yet been paid.
Use this option to write off a member’s outstanding balance when the debt will not be recovered.
When selected:
Paying using deposit assigns any unassigned payments to existing charges.
If the member has prepaid funds on their account, select this option to use those funds to pay charges awaiting payment.
If no deposit exists and the member wishes to pay, use Add Payment above to process payment through Point of Sale.
Deposits can be added using the Prepay option above.
Select one or more invoices to email to the member for reference or payment.
Invoices can be edited from the Invoices option above before sending.
A visual overview of payments received from the member over the past 12 months.
This makes it easy to spot missed payment months, and periods where extra or irregular payments were made.
Hover over any month to view the exact amount paid during that period.
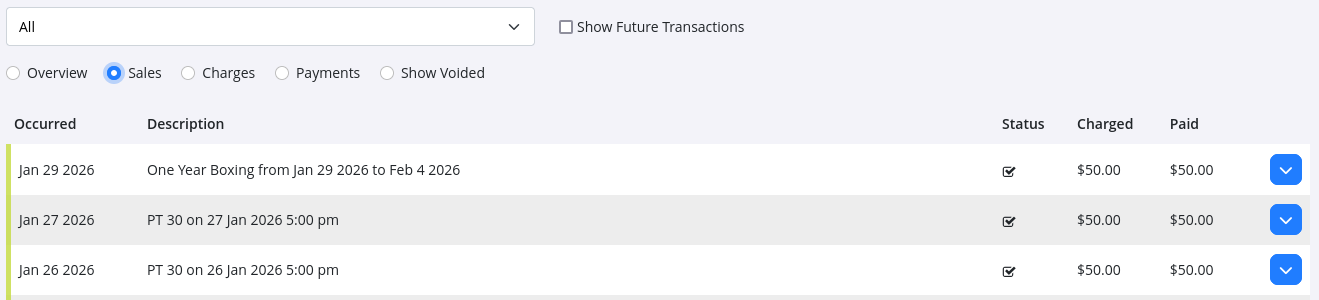
A complete record of all charges and payments, past and future.
Filter display using the drop down (member accounts) and following options;
Overview: All charges and payments in double-entry accounts view
Sales: Charges and payments displayed in cash based accounting view
Charges: Lists all charges, with invoice field. Charges can be added into the same invoice here, by adding related invoice number into applicable charge row.
Payments: Displays all payments made.
Show Voided: Shows all payments or charges that have been voided directly by staff, or indirectly by system when changes occur.
Show Future Transactions: Select to show all upcoming all future billing.
Selecting any row will open more detailed information about that transaction, including related charges and payment history.
Hovering over any payment icon will show you what each of these mean.
Located below the account history table.
Selecting this option exports the displayed data as a CSV file, which will automatically download.
A CSV (Comma-Separated Values) file is a plain text format used to store tabular data, similar to a spreadsheet.
It can be easily opened or imported into applications such as Excel or Google Sheets for reporting or analysis.