The Member Page is the central hub for everything related to an individual member’s account.
From here, you can view details, manage memberships, handle billing, communicate, book sessions, and track training.
To keep things clear and easy to navigate, the page is divided into key sections, each accessed via its own tab.
The left side-bar is described within it’s own page.
Details Tab (Info complete - tidy up. not checked)
Memberships Tab (complete - not checked)
Accounts and Billing Tab (100% complete: checked by Matthew Burr)
Communication Tab (incomplete)
Bookings Tab (not started)
Training Tab (not started)
Side Bar (not started)
The Details tab stores core information about each member.
Field visibility can be customised using Advanced Configuration, allowing you to tailor the page to suit your club’s needs.
If a field listed below is not visible in your system, check Settings > Advanced Configuration > Member.
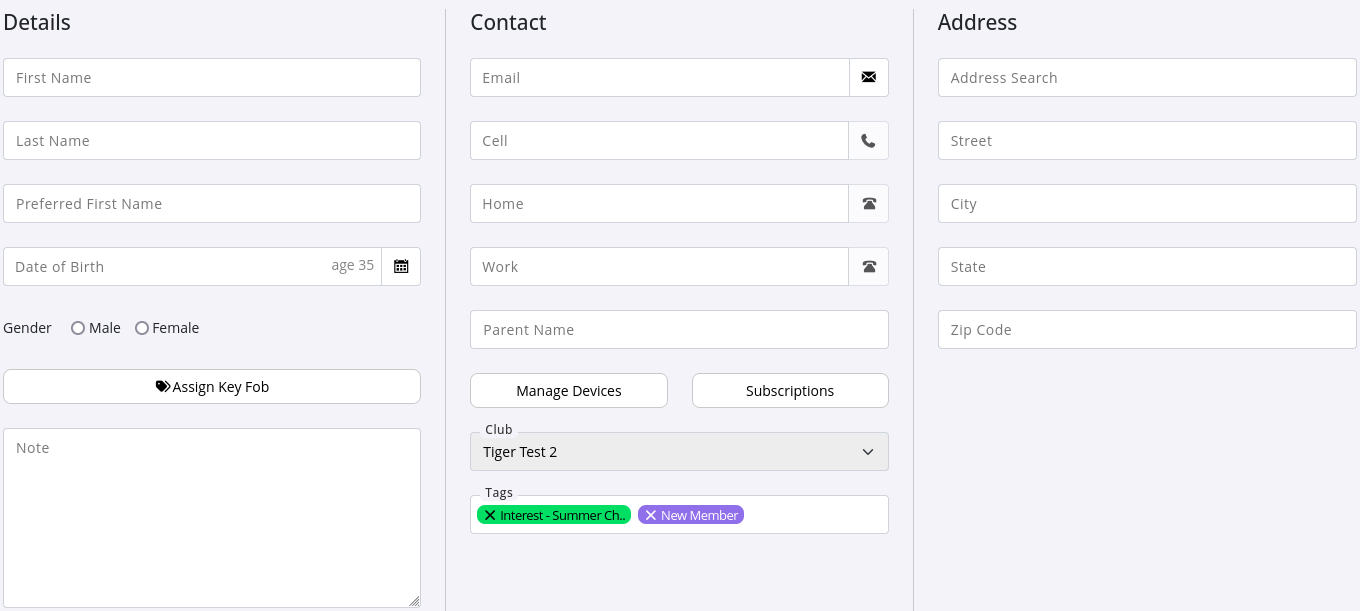
First Name:
Enter the member’s given name.
If you prefer surnames to display first throughout GymMaster, this can be configured via Advanced Configuration.
Last Name:
Enter the member’s family name.
Surname-first display settings are managed in Advanced Configuration.
Preferred First Name:
Use this field to record a nickname or preferred name.
This will appear in brackets alongside the member’s full name across GymMaster, helping staff address members accurately and comfortably.
Date of Birth:
Enter the member’s date of birth where required.
This is especially important if memberships, classes, services, or access are restricted by age.
The date format (Day–Month–Year) is set under Settings > Club Details.
Gender:
Select the member’s gender if applicable.
This setting is used where memberships, classes, services, or door access are gender-specific.
Default gender selections and additional gender options can be configured via Advanced Configuration.
Access Control:
Select the access icon to assign a key fob or Bluetooth Mobile ID to the member.
Assigned devices can be updated at any time.
Use Manage Devices within the Contact section to view and manage devices linked to the member’s Bluetooth ID.
Notes:
Use this section to record internal notes about the member.
There is no character limit, allowing you to capture as much context as needed.
Depending on your workflow, notes can also be recorded in the Communication tab.
The Contact section stores a member’s primary contact details and communication preferences, making it easy to stay connected and manage how your club communicates with them.
Email: Enter the email address used for all email communication from your club, including membership contracts and automated notifications.
Select the email icon to send a personal email directly from GymMaster.
Use Subscriptions within the Contact section to view and manage which automated communications are sent to this email address.
Cell: Enter the member’s mobile number for SMS communication, such as booking reminders and alerts.
If SMS is enabled for your club, notification preferences can be managed via Subscriptions within the Contact section.
Home: Optional field to record a home phone number.
Work: Optional field to record a work phone number.
Parent Name: Designed for clubs working with younger members, this field allows you to easily record a parent or guardian’s name.
Manage Devices:
Control how many devices a member can connect to the GymMaster App.
This added security feature helps protect accounts and is especially important when using Bluetooth access for contactless entry.
Don’t see this option? Contact GymMaster to have it enabled.
Subscriptions:
Manage how the member receives communication from your club across Email, SMS, and the Member App*.
Choose which messages are sent and the channels used to deliver them.
SMS not enabled for your club? Contact GymMaster for setup options.
Club:
Displays the club where the member originally signed up.
Access across multiple clubs is determined by the benefits profile assigned to the member’s membership.
Tags:
Tags are customisable, coloured labels that help your team quickly identify and group members or prospects.
Use them to highlight trial members, VIPs, casuals, or any category that supports smoother front-desk and staff workflows.
Click the field to select an existing tag, or start typing to create a new one.
Address Search:
Address search is limited to the country set in your Club Details.
If needed, you can bypass address search and enter the address manually using the fields below.
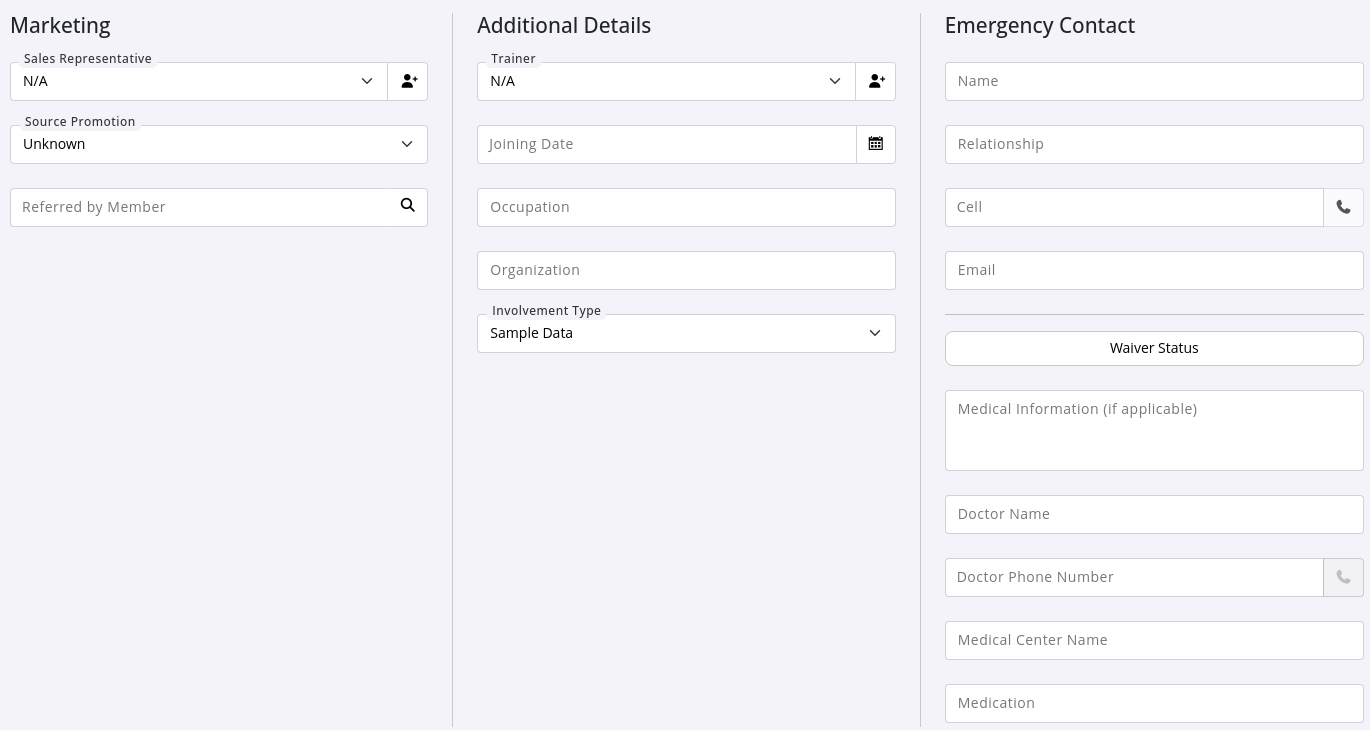
The Marketing section helps you understand how members find your club and who was involved in their sign-up, supporting clearer reporting and smarter decision-making.
Sales Representative:
Was a specific staff member responsible for signing up this member?
Select them here to attribute the sign-up correctly to allocate commission, if this is used by your club.
Any staff member can be assigned as a sales representative via Settings > User Administration > Details.
Source Promotion:
Track which marketing efforts are delivering the most value.
This field links the member to one of your defined promotions, showing where they heard about your club.
Promotions can be created and managed under Settings > Custom Fields > Promotions.
Referred by Member:
Record when an existing member refers someone new to your club.
Simply search for and link the referring member here.
If you run a referral program, this is where referrals are captured to ensure rewards are applied correctly.
Referral programs can be set up under Settings > Financial Configuration > Referrals.
Trainer: If you member has an assigned trainer, select them here. Any staff member can be assigned as a trainer via Settings > User Administration > Trainer.
Joining Date:
This is the date a member first signed up for a membership.
This may differ from their membership start date, which may be set to a future date on purchase.
Occupation:
Optional field to record occupation.
Organization:
Optional field to record organization member is a part of.
This field can be searched from the Find Member page.
Emergency contact details help your team respond quickly and appropriately if a member needs assistance while at the club.
Name: Enter the name of the person to be contacted in the event of an emergency involving this member.
Relationship: Specify how this person is related to the member, such as partner, parent, sibling, friend, or colleague.
Cell: Add the mobile phone number for the emergency contact.
Email: Enter the primary email address for the emergency contact, if available.
Waiver Status: Select this link to view all waivers the member has signed, as well as any that are still pending.
Medical Information: Record any relevant medical details here, including injuries, existing conditions, or instructions to follow in the event of a medical issue.
There is no character limit for this field.
Doctor Name / Number: Enter the name and phone number of the member’s doctor, if provided, to assist in a medical emergency.
Medical Centre Name: Record the name of the medical centre or clinic where the doctor practices.
Medication: List any medications the member has disclosed that may be relevant in an emergency.
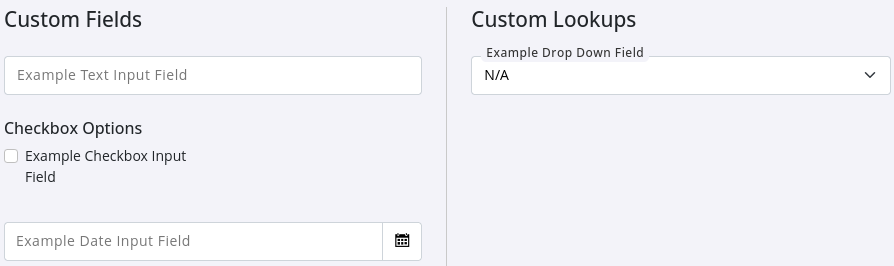
Custom Fields allow you to collect and store additional information that matters to your club.
This could be anything from a member’s t-shirt size or preferred workout style, through to important dates like anniversaries or milestones.
Once set up under Settings > Custom Fields, these fields become available during staff-led sign-ups and online member registration, helping you capture consistent information from the start.
Text Input Field:
Designed for open-ended responses.
Ideal for notes, personal preferences, or questions where members or staff may need to enter free-form information.
Checkbox Input Field:
Best suited to simple yes or no selections.
Commonly used for opt-ins, acknowledgements, or quick confirmations.
Date Input Field:
Keeps date-based information clean and consistent.
Perfect for tracking anniversaries, health milestones, start dates, or target goals.
Dropdown Input Field:
Presents a predefined list of options to choose from.
Helps standardise common responses such as shirt sizes, preferred class types, or other repeatable selections, making reporting and filtering easier later on.