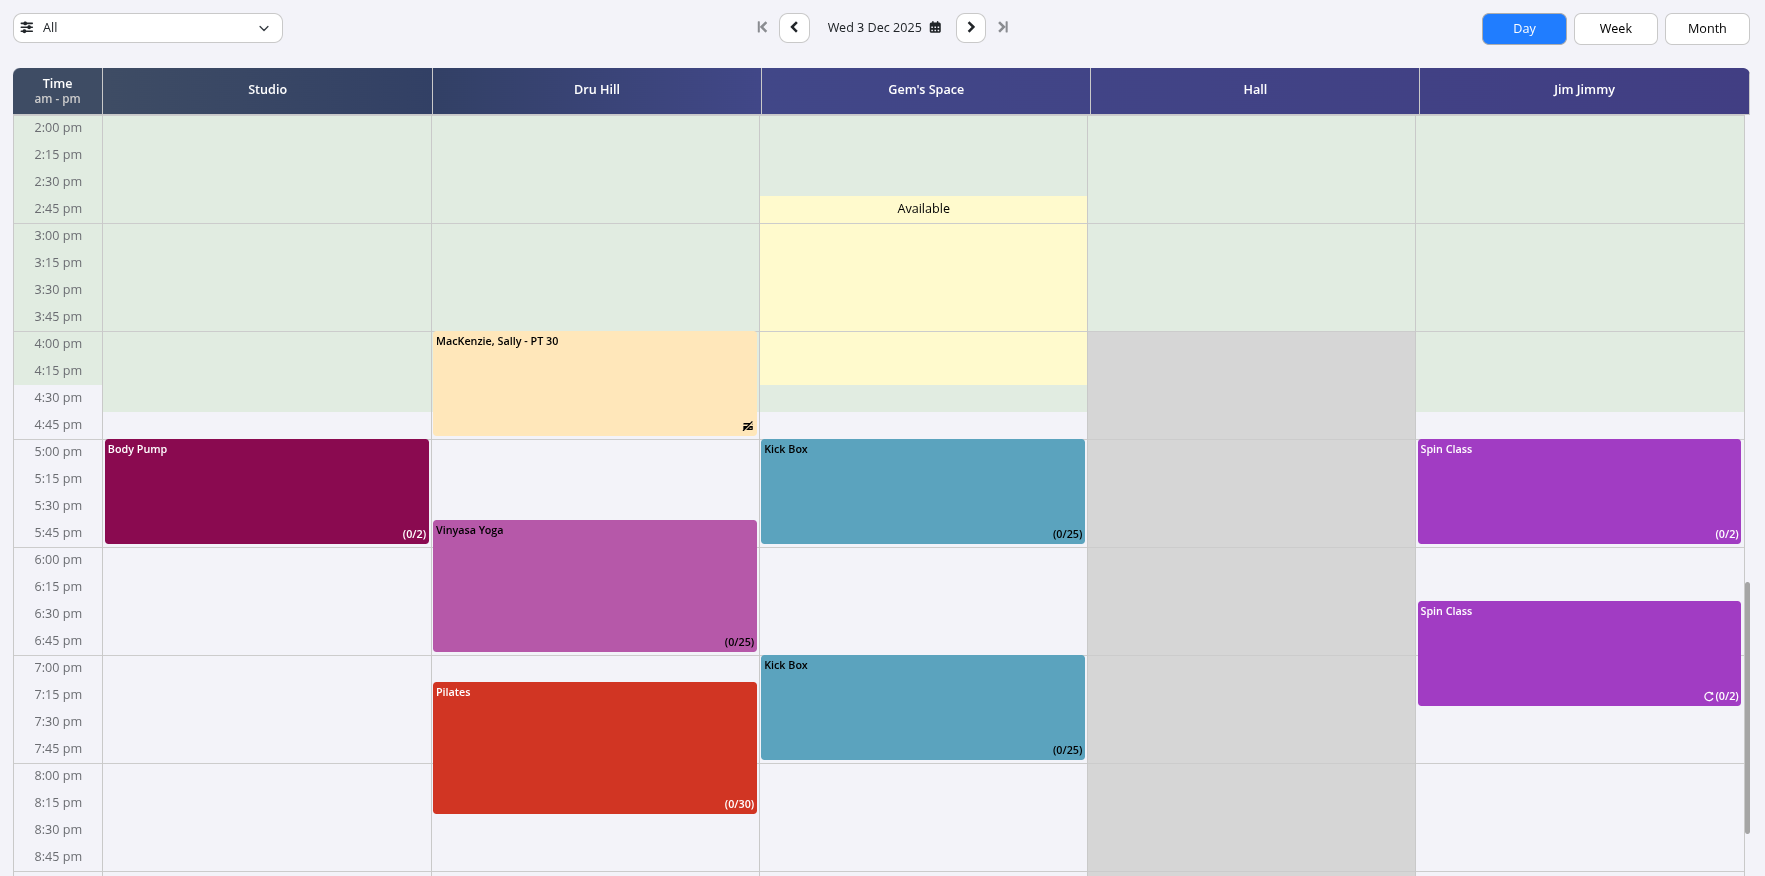
Calendar view for all classes, services, and meetings.
View and manage schedules by day, week, month, or filter by staff member or facility.
Available actions depend on each staff member’s permission level, set in User Administration > Permissions.
Select Schedule:
Use the drop-down menu in the top left to switch between schedules. You can view all facility schedules, all trainer schedules, a single schedule, or all schedules at once.
The options available depend on whether you’re in day or week view mode (top right of the schedule).
Facilities must be added in Settings > Bookings and Classes before they appear here.
Staff can be added via Settings > Bookings and Classes > Staff > + Add Staff.
Date Navigation:
The date shown in the center of the top bar indicates the period you’re currently viewing.
Single arrows move forward or back by one day, one week, or one month—depending on your current view mode.
The double-arrow (arrow with a line) jumps ahead or back by a full week, month, or year.
Day Week Month:
Choose how you want to view your schedule; by day, week, or month.
Day view lets you see one schedule or multiple schedules side by side.
Week and month views show one schedule at a time, giving you a clear big-picture layout.
Days / Dates / Resource Name:
Along the blue bar at the top you’ll see either the day names, the dates, or the names of your listed resources; this depends on your current view mode.
Clicking these headings is a quick way to jump between schedule views or switch into a different mode.
Time:
Time intervals run down the left side of the schedule. These intervals come from the resource category settings.
You can adjust this in Settings > Bookings and Classes > Facility or Staff Categories to match your club.
Off-White:
The off-white background within the schedule shows that a resource is rostered as available and can be booked for classes or services.
It also marks future time that hasn’t elapsed yet.
You manage rostered availability when editing each facility or staff member in Settings > Bookings and Classes > Facilities or Staff.
Green:
Green simply means this time slot has already passed.
It’s a visual cue only and doesn’t change how the slot functions or what you can do with it.
Grey:
Grey background within the schedule indiates time outside a resource’s rostered hours. Bookings can’t be made here by default.
Staff can override this by clicking a grey time block and selecting “Make Available.”
Roster settings are handled in Settings > Bookings and Classes > Facilities or Staff.
Pale Yellow:
This is manually set “Available Time.” You add it by clicking a time block and choosing “Make Available.”
It’s handy for two situations:
Click on a schedule at the time slot you wish to add a booking, meeting, or to change the time slots availability.
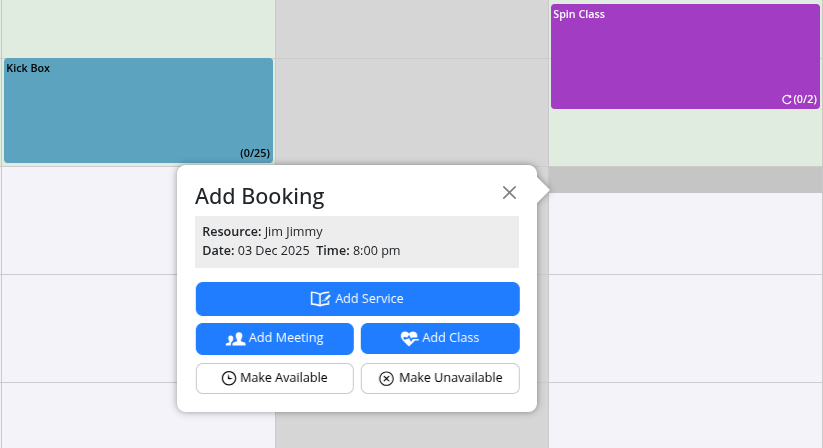
Add Service:
Select to book service for a member.
You will be asked to select member who is making the booking. Services and prices that will be offered for booking by this member will depend on the benefits of the membership they currently hold.
Check the time, date, facility and trainer all match requirements.
Only trainers and facilities that are allowed to book this service category will appear in drop-down options.
Add Class:
Select to add a class to schedule to which members can book into.
You will be asked to select class; if not yet added into the system you can do this within Settings > Bookings and Classes.
Check the time, date, facility and trainer all match requirements.
Only trainers and facilities that enabled “Allow Class Bookings” will be able to book a class to their schedule
Add Meeting:
Choose this to add a meeting to the resource, or to block out time for any other internal purpose.
A meeting reserves the slot and prevents any other bookings from being made.
Make Available:
Choose this to open the selected time slot for bookings.
It’s useful in two main ways:
It allows specific hours to be made available for members to book a trainer or resource online.
This is especially helpful when trainers only want to offer 1-on-1 sessions during set times.
You can use the repeats option to keep these hours available at the same time every week.
It lets staff override unrostered hours so a class, service, or meeting can still be scheduled when needed.
This means you can make a time available even if it falls outside a trainer’s normal roster.
Make Unavailable:
Choose this when you want to block a rostered time so staff cannot book anything during that period.
It’s ideal for blocking out a portion of a day — or the entire day — when no bookings or meetings should be added.
If this timeslot is consistently unavailable, such as a lunch break, this can be added in the roster. Do this in Settings > Roster and Open Hours then add a row to the roster. This allows you amend the roster to allow for lunch breaks.
Repeats:
Every option above includes a repeat function so you can easily set up daily, weekly, fortnightly, or custom repeating patterns.
Use Custom if you need something like every Monday and Thursday.
If the repeated booking needs a different time slot, create a new booking for that variation.