Obtaining Remote access to GymMaster database
Contact GymMaster support for further assistance
Main steps covered here:
- Back-up your database
- Assigning static IP address to database computer
- Allow traffic through the Windows firewall
- Configuring port-forwarding
- Configuring PostgreSQL program for remote access
- Testing the changes made
The building housing your database will require a non-changing IP address for its Internet connection. A static IP address allocated by your ISP would be the best solution, however, you can get a simulated one by clicking here Most of the instructions below contain Windows-specific instructions, however, the principal is the same for any computer. Mac users click here
Back-up your database
Before making any changes, however seemingly small, we recommend that the database be backed-up. Start GymMaster -> Settings -> Backup Database We recommend the use of a portable USB drive, or similar. A backup location which can be taken off-site. Select the destination where to save the backup. Select Backup Now. When complete, a popup message will appear to that effect. Safety check – Open the destination folder, and check the size of the file just created. Should be greater than zero.
Give the main database PC a static IP address
On Windows (Vista, 7, 8+), open the Network and Sharing Centre. Select the ‘Local Area Connection’. Select ‘Details’ to obtain MAC address of PC, and ‘Default Gateway’. Record these for later. Close windows back to ‘Local Area Connection’. Select Properties. Highlight IPV4, select Properties. Select ‘Use the following IP address’. Type in the desired IP address and record this for later. We recommend one which is many numbers ahead of the current IP address. By default, most routers start allocating IP addresses with low numbers, for example: 192.168.0.1 onwards. We recomend selecting one with a high number, for example: 192.168.0.100. This helps if the router is replaced, and the settings are not the same. Type in the ‘Subnet mask’ and ‘Default Gateway’. OK to save and close.
Allow database traffic through the Windows firewall
On Windows, Start -> Control Panel -> Windows Firewall In the left pane, click Advanced settings. Administrator permission required If you’re prompted for an administrator password or confirmation, type the password or provide confirmation. In the Windows Firewall with Advanced Security dialog box, in the left pane, click Inbound Rules, and then, in the right pane, click New Rule. Scroll down to find ‘Postgres’, tick the ‘Allow’ box. If ‘Postgres’ is not present, make a new rule, allowing incoming traffic on port 5432.
Configure router always to give the same IP address for main database computer
This is a safety measure. All router user-interfaces are different. Usually found in ‘DHCP’ section, or similar in the router configuration menu. Google search for ‘router-model-number + Set Up a Static IP Address’. Use previously recorded MAC address and database PC IP address.
Configure router port-forwarding
The following information is sufficient for almost all routers. If in doubt, do a Google search for ‘router-model-number + how to configure port-forwarding’, or go here for assistance with port-forwarding
Open any browser, type into the address bar the IP address of ‘Default Gateway’ previously noted.
Enter user-name and password. Most routers have a user-name/password requirement for access.
These are frequently not changed away from default. Google search for ‘router-model-number + default password’.
Set up port-forwarding:
Incoming connections on port 5432 to be sent to database PC IP address
Reboot router. Check all IP addresses for correctness.
Configure PostgreSQL database program
Start -> Control Panel -> Administrative Tools -> Services.
Scroll down to find and highlight “postgres” or similarly worded.
‘Stop’ the service.
Open the Windows File Explorer, navigate to C:\postgres\data.
Select pg_hba.conf, and open for editing.
At the end of the file, add the following line if it does not already exist:
host all all 0.0.0.0/0 md5
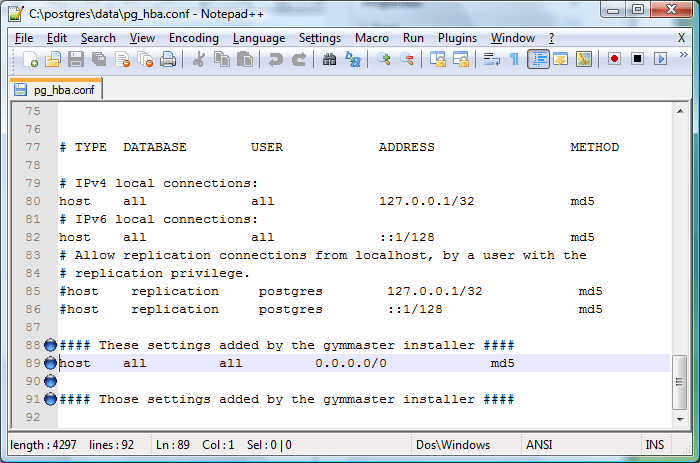 Save and close the file.
Open the Windows File Explorer, navigate to C:\postgres\data.
Select postgresql.conf, and open for editing.
Locate the following lines, and alter them as follows, if they are not already:
Save and close the file.
Open the Windows File Explorer, navigate to C:\postgres\data.
Select postgresql.conf, and open for editing.
Locate the following lines, and alter them as follows, if they are not already:
listen_addresses = '*'
port = 5432
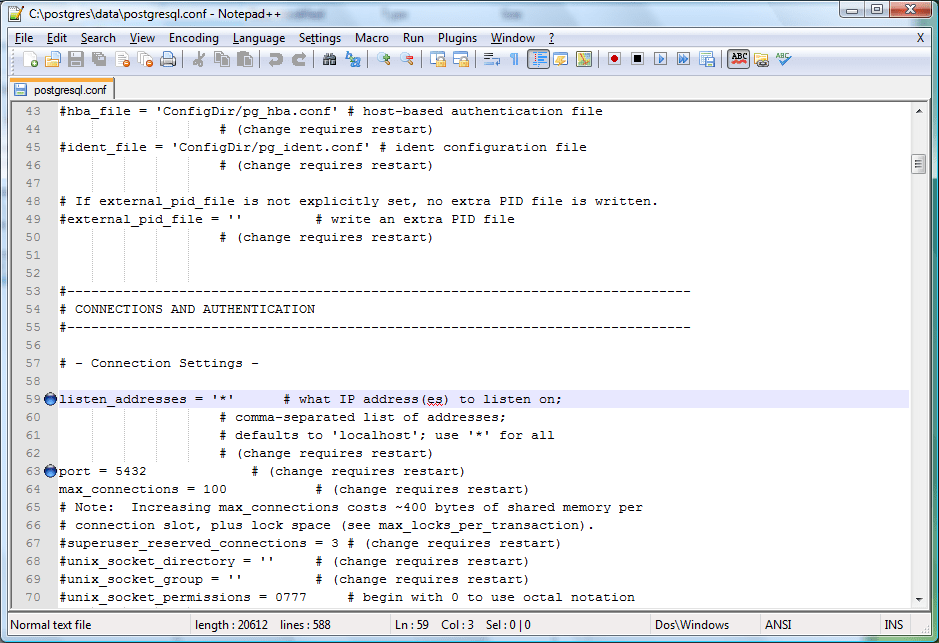 Save and close the file.
Start -> Control Panel -> Administrative Tools -> Services.
Scroll down to find and highlight “postgres” or similarly worded.
‘Start’ the service.
Restart the computer to ensure all changes are set.
Save and close the file.
Start -> Control Panel -> Administrative Tools -> Services.
Scroll down to find and highlight “postgres” or similarly worded.
‘Start’ the service.
Restart the computer to ensure all changes are set.
Test database connection from local network
Ensure Postgresql service is running: Start -> Control Panel -> Administrative Tools -> Services.
Scroll down to find ‘Postgresql’ or similar. Should be running already.
Open command-line window. Start -> Run -> cmd, type the following without quotes, press enter:
psql -h "local-static-IP-address-of-database-computer" -U gymmaster
example: psql -h 192.168.1.50 -U gymmaster
Password requested? Success!
Test database connection from outside of the local network (eg: on a laptop from home)
Ensure Postgresql service is running, as above, on the target database computer. Check this before you leave the building!
Open command-line window in the remote computer. Start -> Run -> cmd, type in without quotes the address recorded earlier:
psql -h "static-ip-address-of-gym" -U gymmaster
example: psql -h mygym.no-ip.biz -U gymmaster
Password requested? Success!
Configure GymMaster on the remote computer (eg: on a laptop from home)
Start GymMaster.
In the system tray, click the GymMaster Launcher, select Launcher Settings.
In the Server IP address field, type in without quotes the address recorded earlier:
"static-ip-address-of-gym"
Restart GymMaster for this to take effect
You should now be able to run GymMaster to access the database remotely, eg: from home or a different office
Configure remote access for Mac users
Follow the general instructions above for setting up static IP addresses and for port-forwarding. Then open the file explorer program. Select “Applications”. Right-click on GymMaster, select “Show Package Contents” Find and open “shell.conf” Edit the line which reads: “db_host=localhost” to read “db_host=static-ip-address-of-gym” Save and close the file. Restart GymMaster for this to take effect Contact GymMaster support for further assistance You should now be able to run GymMaster to access the database remotely, eg: from home or a different office.